 |
| www.hoobble.com |
MARK THIS DATE IN HISTORY!
No, it's not just pay day. Although if you want to assign monetary value to each minute lost in redundant, unnecessary communication, then this site does nearly equate to willing the lottery.
Hoobble Homework is now available on the android market and is as easy to use as Facebook. In fact, you can even LOG IN with your Facebook account! I am not getting paid for this publicity, I swear, I am just really really excited about it. Can you tell?
What is Hoobble?
Hoobble is a free website that allows teachers to update homework online. Once they have generated a class and added homework, an "embed" button appears, in which teachers can copy and paste the embed text into their school website, and it will AUTOMATICALLY UPDATE THE HOMEWORK TO MATCH THE MOST CURRENT CONTENT ON HOOBBLE.
Great. So how is this different from everything else out there?
Parents and students can create free accounts from their home computers. They can also DOWNLOAD THE FREE APP to see the homework FROM THEIR CELL PHONE if they have an Android phone.
Most importantly, if multiple teachers choose to sign up and enter their homework there, parents and students can see all the homework in one place, without having to go to each teacher's website of choice. Parents can even create multiple "profiles" for their different kids, so they can see any and all homework that is listed in the system.
That sounds complicated.
It's not. Follow the below instructions and you'll be up and running in no time.
1. Go to Hoobble.com and sign up for a "Teacher" account.
Hoobble Website - Click Here
2. Click "login" in the top right-hand corner.
3. EITHER log in using your Facebook account, or Under "Get Help" on the bottom right, click "Register".
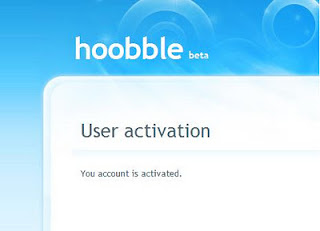
 IF you register using an email and not facebook, you will get a verification code sent to the email you provided. Log into your email, open the Hoobble registration email, copy the verification code and paste it into your browser. Hit enter. You should get the following screen if it worked.
4. Now you can click the "Login" button again, and actually log in this time. I have made a dummy account, shown at right, that you are welcome to try out.
Just email me at support@mathbymandy.com if you want to try it.
5. Complete the "Create Account" fields. Type in something like Mrs. Bellm or Mrs. Mandy Bellm or Math 7. Something obvious for parents and students to find when they look up your school. Make sure your account type is set to "Teacher". Then click "save".
6. You will be sent to an "Instructions" screen. It will inform you that you must create a "profile" before you can enter homework (logically!). It even has an active link that you can click to go to "your settings". Click it.
7. Click on the only choice on the screen, which is "Add Subject".
8. Select your school. If it is not in there, select "Add School" and type in your school's information.
9. When your information is correct, go ahead and hit "OK". You will be redirected back to the "Settings" page. If you teach multiple subjects or classes, repeat steps 7-8 until all the classes you teach show up on the Settings page.
10. Now you can click on the "My Homework" tab from the top menus and start adding homework!
11. Click the "Add Homework" button to add a new assignment. If you have multiple classes built, you will have a drop-down menu. Select the class you want to add an assignment to.
12. Enter something in "Group". If you differentiate, you might type "level A" or "gold level". If everyone has the same assignment, just type "Everyone" into the group. You must have something typed in that box or your assignment will not save.
13. Click inside the field to the right of "date" and a calendar box will appear. Click on the date you want the assignment to be posted under. It will then populate in the date box.
14. Now you have freedom to choose which boxes you want to fill with what. Your assignment choices are "learn", "read", and "make". You do not have to use all three of these boxes, but you must fill in at least one of them. If a box is left empty, it will not show up on the published assignment.You can type as much or as little as you like in each box.
15. When you are satisfied, click "Create".
16. Viola! The assignment has been published. It is now viewable to you, parents and students. If you see something that looks off or wrong, you can click on "details", "edit", or "delete" to look at it more closely and/or change it.
17. Continue adding homework for the week/month/year/millenium until you are satisfied with your updates. DON'T FORGET TO CHANGE THE CLASS NAMES IF YOU HAVE MORE THAN ONE!!!
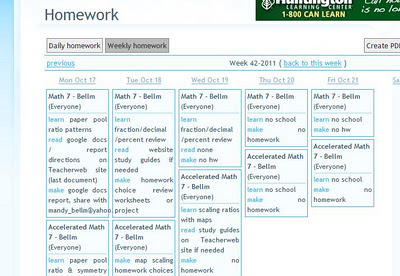
 Here's what mine looks like for this week. Since I teach multiple classes, I can see both of them at the same time. You'll notice I have clicked on "weekly homework" so it is gray. You have to click the arrows to go to the week you want, otherwise it will default to whatever week it is right now. You can also click the "daily homework" if you'd rather just look at one day at a time.
I also noticed that I have a bad habit of forgetting to change the date, or putting in this week's date instead, so when I went to look for the homework, I couldn't see it. If this happens to you, just page back and forth to the previous/forthcoming weeks until you find it. Then click the assignment and click "edit", change the date to the correct one, and hit "save".
18. Now comes the fun part. This is the only "techy" part. I promise. Hang in there, you non-techy people. You don't need to know what it is or what it means, you just need to follow the steps carefully. If you do it right, you'll look way smarter than you really are. (like me!) (I mean, I look smart, but I'm really not. I just know some tricks ;)
Go to the "Settings" tab from the top menu again, and click it. Then click on "My subjects" in the bottom right corner. You should be able to see your class or classes listed, with three choices to the right of them, that say (embed/update/delete). To transfer all the information that you just typed into Hoobble, to your school website, click the "embed" button. A pop-up screen will appear that looks like this:
19. Highlight all the text in that little text box so it turns blue, and then right-click your mouse, and select "copy".
20. Boot up your school website. Decide where on your website you want this information to post. IT NEEDS TO GO INTO A "PLAIN TEXT" FORMAT BOX. Most school website programs already have this format anyway. It's usually a welcome page or a default setting page that is blank, but you can type in it and sometimes add pictures to it. What I suggest to new teachers who can add tabs to their website, is to have a tab dedicated to homework for each class you teach. Here is what mine looks like.
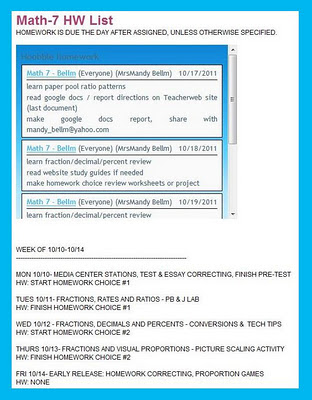
21. Go to the homework tab or welcome page, or wherever you normally type your welcome and/or homework in manually. YOU NEVER HAVE TO DO IT AGAIN!!!! HALLELUJAH!!! Click in the text-box like you are about to type. Now right-click and select "paste". Some text boxes only allow you to paste by hitting CONTROL+V. Either way works. Your lovely little text should now show up in your text box. Here's an example of what mine used to look like, when I manually typed it in, and what it looks like now, with the text box embedded.
22. Now for the MAGIC. (Assuming you pasted it correctly into a plain-text formatted site)
Save your updates. View your site. You should now have an interactive, live-feed, full-color menu that parents and kids can click on, drag up and down, and press the links to see more assignment information.
If it didn't work, it is probably your website that has the problem, not the Hoobble app.
 Here is the fully functional Hoobble app, embedded into my updated website. Tell me which interface you like better.
The old-school text on the bottom of the picture? (which I used to think was pretty high tech)
Or the new Hoobble homework box on top? (DUH!)
You can visit my TeacherWeb Site, if you want to play around with the text box and interact with it. Click either the "Math-7 Homework List" or the "Accelerated Math HW List" tabs to check it out.
And that, my friends, is a wrap. You may have to instruct parents on how to download free apps from the Android market, but my guess is, if they have an Android, they've probably been playing with it non-stop and/or could figure it out on their own. Just make sure they spell it right. H-O-O-B-B-L-E. I do not yet know when or if the app will become available for iPhones.
To sum up the benefits, which I now cannot remember if I stated:
-This is a one-stop shop for parents, whether or not they use it on their phones or just their computers. They can see all of their kids in one place, IF all their teachers are on board and choose to use the system. They can check homework from home, work, on the go, and yell at and/or ground their kids from the cabin if they are lucky enough to get a signal for their phone.
-The more teachers who jump on board, the more useful of a tool it is. The less button-pressing and manipulating and repetitive communicating will go on between teachers, parents, students, administrators, etc... because the information is all stored in one place.
-The automatic updates from Hoobble to parent phones to your school website, using the "embed" tool, will keep everyone in the loop, and provide a long-term record of when assignments were given, thus improving accountability.
-BEST OF ALL!??!??! IT'S FREE! 'Nuff said.


No comments:
Post a Comment